Products
BeerTools Pro 2.1 Download (Windows)
$24.95 USD
BeerTools Pro 2.1 Download (macOS)
$24.95 USD
BeerTools Pro 2.1 Download (Linux)
$24.95 USD
Building a three tier brewing system
2003-01-02
The thing that sparked his idea was a sale that Costco (a U.S. wholesale warehouse) had on 32 quart turkey fryers. He bought three for about $75 usd ea. Each stainless steel pot came with a lid and a burner with stand.
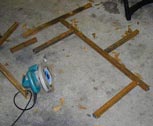 The next thing he needed was a rack system that could support the weight of the three vessels. Jeff visited his local metal salvage yard and found approx. 30 ft. of 1 1/2" square tubing that was 3/16" thick. At 18 cents a pound it worked out to around 20 dollars of material. He wanted the rack footprint to be relatively small so he went with a staggered design that placed the sparge vessel directly over the brewing pot. He utilized the existing burners and stands in his design. The pieces for a simple rack were cut and welded in a couple of hours.
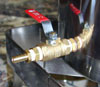 Now he needed to figure out how to install valves that wouldn't require welding. The solution was found in the plumbing section of a home improvement store. A few online picture revealed how to assemble a simple wield-less fitting using 1/2" MIP to 3/8" compression adaptor. The design of this adaptor allows for the use of a number 206 O-ring slipped over the compression side of the adaptor to seal against the outside of the vessel wall when inserted into the pot. The compression ferrule is removed to allow the compression nut to tighten against the inside wall of the pot. The O-ring is made from a special material called viton, which can tolerate temperatures up to 450 degrees Fahrenheit.
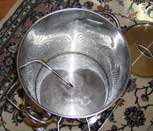 The mash/lauter tun would need a false bottom for extraction. Jeff found scrap perforated stainless steel at a scrap yard that to his delight was 3/32" holes on 3/16" centers. Which is ideal for false bottom use. Although circular it had to be trimmed to fit the bottom of the pot. A piece of stainless steel round rod was bent into a circle to fit the diameter of the pot as well. This served to provide clearance under the false bottom. A hole was drilled in the middle of the false bottom, and a piece of stainless tube was used to connect this hole to the valve. (This tube was locked in place when the valve was inserted)
The valve holes were drilled smaller the the target 9/16". A tapered grinder was used to size and de-burr the hole. The holes were drilled 2" above the bottom of the pots. Teflon tape was used to seal the threads in the valve assemblies. Now that the pots were complete the three tier rack system could be assembled. The burner stands were slid on, the pots were positioned and finally the vinyl tubing was affixed. The last step was to connect the propane tanks to the system.
Now comes the fun part, brewing! This system is very easy to use and it saves a lot of time and energy. The pots and burners cost about $240, the materials for the rack was around $20 and the valves and fittings ran an additional $30, the propane tanks ran a total of $50 for two. The whole system was made for around $350 usd.
Jeff can now make triple, triple was a beer that he couldn’t make formerly because of volume limitations. He remarked “If I make three or four batches of triple, I have basically covered the cost of the rack system.”
Recently Added

Spotted Tongue 2026 Dunkel Is Wiser
Dunkles Weissbier : All Grain
Trying different malts in a wheat beer.


Best Bitter : All Grain
Scaling a 5 gallon batch up to 7, based on this recipe: https://barclayperkins.blogspot.com/2016/03/lets-brew-wednesday-...

Spotted Tongue 2026 Red RyeDer
Specialty IPA : All Grain
For the QUAFF July 2026 Club Only Competition.
Recently Reviewed

Maibock/Helles Bock : All Grain
Hofbrau uses the 34/70 yeast but 308 worked best
Been brewing this for years, came out great but very dry this time. I think I might have actually achieved over pitching...
2025-12-27 2:08pm
Special/Best/Premium Bitter : All Grain
Recipe from Goddard's Brewery, Isle of Wight UK. Typical english bitter with a hint of toffee flavor and smell from the...
20L strike and 25L boil? How long for the mash - 60mins?
2024-11-15 6:03pm
Spotted Tongue 2024 Summer Saison
Saison : All Grain
Trying Lallemand Farmhouse Hybrid Saison yeast for the first time.
Finished a little sweet for a Saison, next time omit the Munich and/or Melanoidin malt. The Lallemand Farmhouse Hybrid...
2024-10-26 7:15pm